Tunic’s late and post-game content is almost exclusively tied up in dozens of cryptic puzzles which will take you across the island all over again in search of fairies, manual pages, and more. One of the deepest and most convoluted mysteries of the game centers around the Secret Treasures, which are twelve enigmatic golden items locked away behind riddles and puzzles. Each one will grant the player an achievement, so read on to find out how to get them.
Secret Treasure 1 (Mr Mayor)

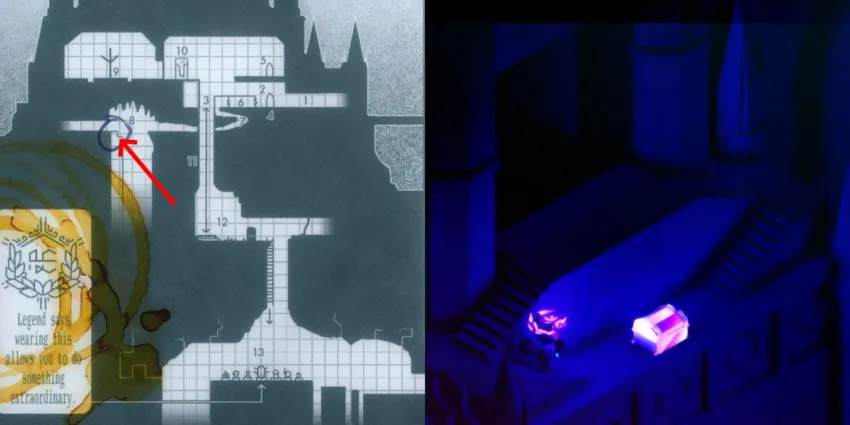
The first Secret Treasure can be found as soon as you grab the Hero’s Grave Key at the start of the game, though if you’re on your first playthrough you likely won’t even realize there’s a chest hidden away. In the room where you find manual page 10/11, right after the locked door, take a look at the wall. If you’ve learned a bit about the Holy Cross, you should recognize the pattern there. Tap out the pattern on either side using your D-pad or arrow keys, and a hidden door will swing open. Inside, a chest holds your prize.
If you can’t figure out the pattern on the wall, don’t worry: it’s right, up, left, up, right, down, right, up, left, down, left, up, right, up, left, down (or the mirrored equivalent).
Secret Treasure 2 (A Secret Legend)
Even by the standards of Tunic’s secrets, the Secret Legend treasure is a doozy. First you’ll need access to the Cathedral, and to go visit it at night (you can change between day and night by sleeping in the Old House). Turn left on entry, and you’ll find yourself in a nice little room lined with bookshelves. Press A at the wall to reveal a secret door, which will lead to a chest. Behind that chest, you can press A once again at another wall to reveal a second secret door.
Follow the path down and you’ll eventually come to a cavern with a pearlescent bridge spanning it. Cross the bridge, and you’ll be right by the chest. However, there’s a problem: the bridge is blocking access to the chest. The solution is, if not straightforward, at least elegant. Continue on past the chest and you’ll unlock what amounts to a back door to the Cathedral. Return to the Old House, sleep your way into daytime, and head back to the Cathedral via the door you just unlocked, using the laurels to zip across the columns in the graveyard. In the light of day, the bridge will have disappeared, granting you access to your next Secret Treasure.
Secret Treasure 3 (Sacred Geometry)
The key to obtaining this Triforce-inspired treasure can be found on page 53 of the manual. In the scribbled hints and clues, you can find reference to the Overworld’s windmill and the patterns on its arms. Travel to the windmill and pay attention to the tears on its sails. Starting at the appropriate square and following the directions from the manual, spiralling inwards, tap out the various directions on your D-pad or arrow keys. At the end of the code, a chest will appear holding your reward.
If you can’t figure out the pattern, don’t worry: it’s down, left, left, up, up, right, right, left, down, right, up, down.
Secret Treasure 4 (Vintage)
The fourth Secret Treasure is another one that requires going to a specific place and tapping out the code, and the steps to figure out any of it might make it one of the toughest puzzles in the game.
First of all, you’re going to need page 1 of the manual. That alone requires you to figure out the meaning of the Golden Path and unlock the door at the top of the mountain on the Overworld. With page 1 in hand, you need to follow a cryptic hint at the bottom of page 51 that advises you to stand in water doing nothing for 60 seconds and then open the manual to page 1.
A secret clue will appear at the bottom of the letter from the developers, with a picture of a small bit of beach on the Overworld and a haiku in the game’s runic language. Translated, that haiku reads: “The softest feather, corrected eleven times, departed once more.” This seemingly nonsensical poem is actually the secret code you need to tap out at the location above: down (i.e. a very soft kind of feather) once, right (or correct) eleven times, and finally left (or departed) twelve times (that is, once more than the previous step).
Secret Treasure 5 (Just Some Pals)

This Secret Treasure, a collection of golden skulls, is a little different from the others. If you explore the Old Burying Ground outside the Cathedral, you may come across a couple of golden skulls (they might look slightly reddish at night). In truth, there are four of these skulls, and you need to nudge each one into a small puddle by a gravestone.
Three of them are fairly straightforward to find, but one is nestled behind a grave with a cross on it in a larger pond, and is easy to miss. Once you’ve knocked the final skull into the puddle, a chest will appear with the treasure.
Secret Treasure 6 (Regal Weasel)
This treasure, a replica of the crown visible in publisher Finji’s logo, isn’t accessible until you’ve picked up the Magic Dagger, the Magic Rod, and the Magic Orb. Once you have them, head down to the Lower Forest, where the broken golden monolith is located. Over on the western side of this area, you’ll find a tall, narrow platform, with a single slime enemy and a sparkling chest hiding tantalizingly out of view.
It might seem impossible to get up there, but as usual the manual has your back. On page 53, a scribbled hint will clue you in to the solution. You need to equip all three magic items, then lock on to the slime and press the buttons for the Magic Dagger and the Magic Rod at the same time. This will fire off a long-range blast of ice magic, freezing the slime in place. Quickly use the Magic Orb, and you’ll be able to grapple to the frozen slime and gain access to the chest. If you fudge the timing slightly and accidentally kill the slime, don’t panic: quit to the menu and reload your save, and you’ll re-enter the area from the doorway rather than respawning back at the last shrine.
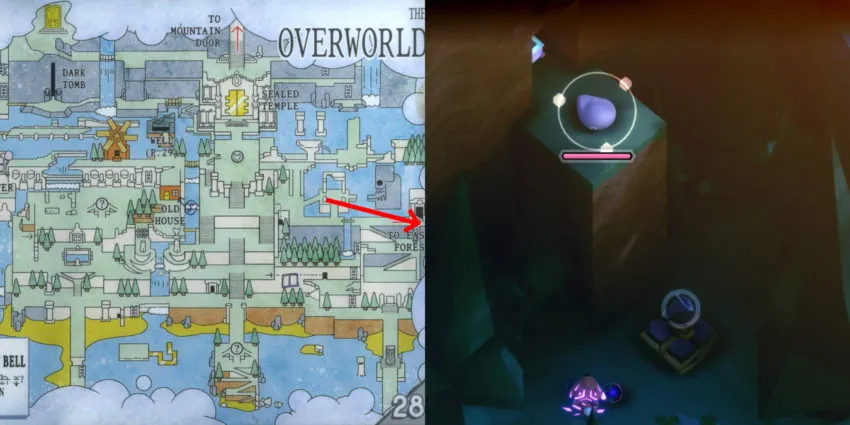
Secret Treasure 7 (Spring Falls)
In the grand scheme of things, this Secret Treasure is pretty uncomplicated to pick up. Later on in the game, you may come across some friendly fairies locked away behind various puzzles across the world. These puzzles are generally a little more straightforward than the Secret Treasure ones, simply requiring you to go to the right spot and figure out a Holy Cross pattern to tap out, but there are 20 of the game so it’ll take a while to find them.
Luckily, to nab this Secret Treasure, you only need to find half of them. Once you’ve freed ten fairies, return to the Secret Gathering Place behind a high-up waterfall in the Overworld, and the chest containing this golden flower will appear.
Secret Treasure 8 (Power Up)
The next Secret Treasure requires cross-referencing between clues on two different pages of the manual. On page 34, the map of the Ruined Atoll, you may have noticed the compass in the bottom-left corner. At each cardinal direction, someone has scribbled in musical notes signifying a particular melodic movement. Using that as a guide, head to the Old House in the Overworld (where the bed is), and have a listen to the windchime outside. It’s generally easier to hear if you head there at night, and if you turn down the other volume sliders in the options.
Pay close attention to the melody the chime plays, and map it to the requisite directions from the compass to reveal a Holy Cross pattern. It’s generally grouped in two-note sections, except for when it’s a chord: an upward movement denotes up, a downward movement means down, if it stays on the same note it means right, and if it plays a chord that’s left. Tap out the pattern outside the Old House and the chest will appear.
It can be tricky to make it out just right, so if you’re having trouble, here’s the code: up, down, right, up, down, left, up, down, left, right, down, left, right, up.
Secret Treasure 9 (Back to Work)
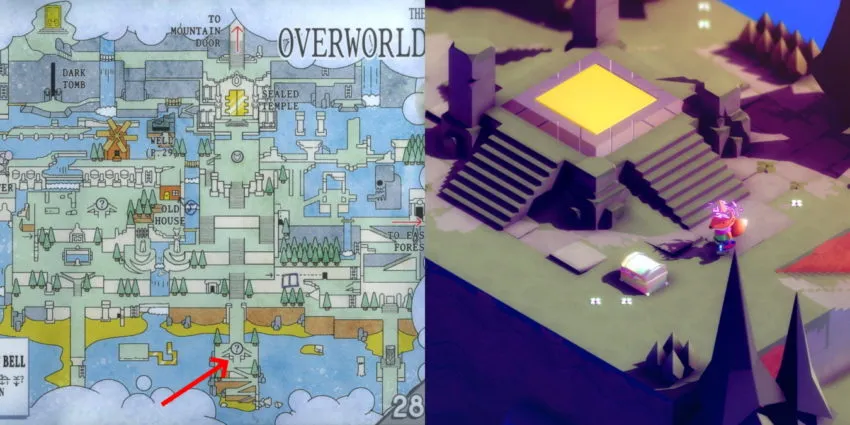
This one may be one of the most quietly devious puzzles in the game. If you take a look at page 11 of the manual, which outlines the basic UI of the game and features a screenshot of a very early section of the Overworld, you might notice something off. In the manual, there’s a chest by the teleport pad, but when you visit that location in the game there’s nothing to be found. How curious.
Cast your gaze back to the manual, and to the info box pointing at the chest. See those dots scribbled in? Tap out the pattern, starting from the largest one, and the chest will materialize in the real world.
If you’re having trouble figuring it out, the pattern is: right, down, left, up, left, left, down, right, right, down, down.
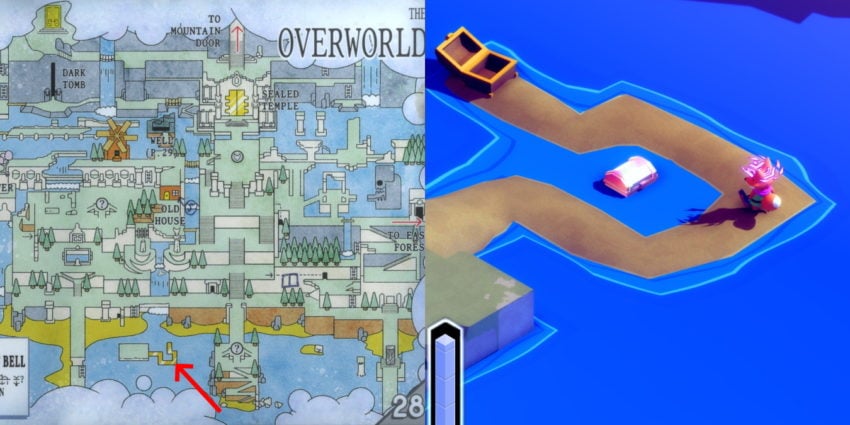
Secret Treasure 10 (Phonomath)
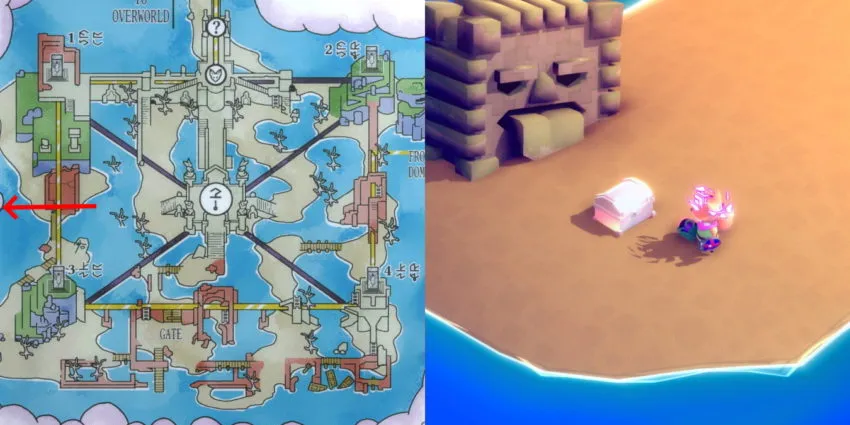
This is one of the easier treasures to find, but it can still be pretty tricky to locate, and you won’t be able to access it until you have the laurels and are able to sleep in the Old House to return to the daytime. Once you do, return to the Ruined Atoll (which is only accessible in the daytime), and head to the west coast of the peninsula.
On the map on page 34, you might notice a scrawled-in arrow pointing out west from that location, and sure enough, should you dash out to sea from the beach, you’ll find a sandy outcrop where the chest holding this Secret Treasure will be waiting for you.
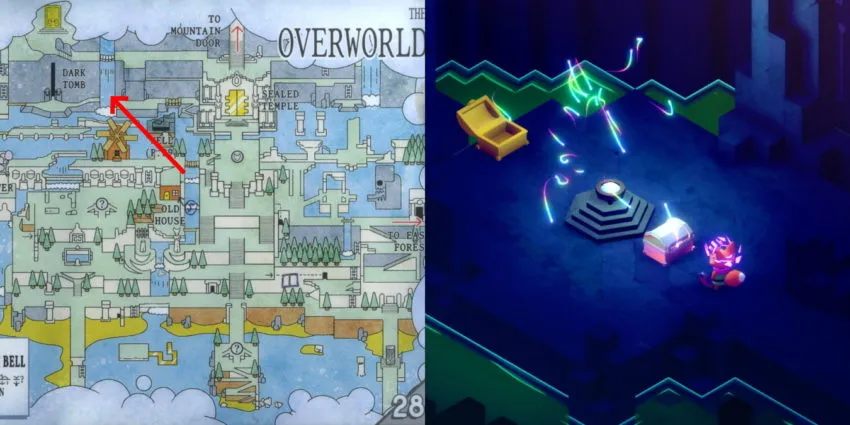
Secret Treasure 11 (Dusty)
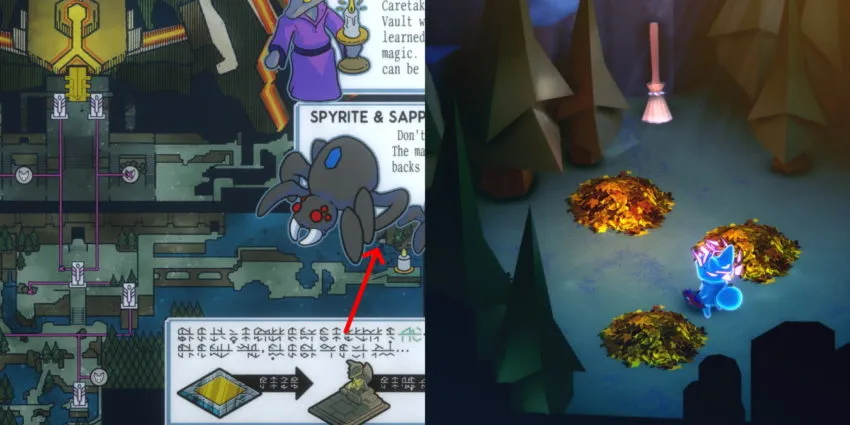
This is another treasure that you’ll need the laurels to grab, but luckily you may well come across it as you’re scouring the map to find the Hero’s Graves in the late game. By the Hero’s Grave near the Fortress of the Eastern Vault, you can spy a couple of small stepping stones leading north across the water (indicated on the map by a scrawled arrow). Zip across them with the laurels and you can enter a cave with a few piles of leaves on the ground and a broom leaning against the wall.
Slash at the leaves with your stick or sword to dispel them, and once you’ve disposed of the final pile a chest will appear. Open it up to receive a golden broom.
Secret Treasure 12 (Forever Friend)

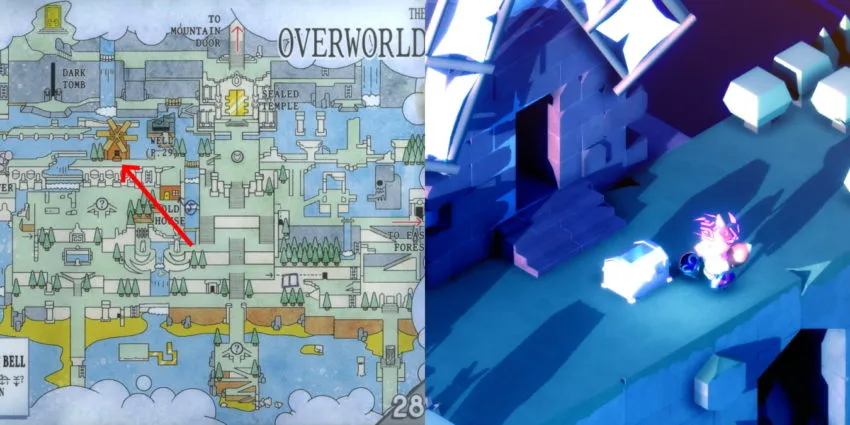
The final Secret Treasure is easily missed, but as is often the case with these secrets a subtle clue is hidden in the manual. On page 41 you can find a map of the teleport hub, accessible by praying at any of the yellow pads found at various points around the island. You might think you’ve unmasked all the secrets hiding in this area, but there’s one last one to be found.
Between the main teleport hub and the lonely one to the south, you can zip out westward on some invisible platforms, as indicated by a scribbled-in dotted line on the map page in the manual. Find the right spot and you can use the laurels to dash out away from the main path, eventually coming across the chest that holds your prize.