In Path of Exile, Templar is a class that sits neatly between the Strength and Intelligence trees, merging the two into a potent mix. It’s known for the best access to aura skills and nodes and the use of a scepter and shield combo in combat. Over the past several leagues, the Templar has had a good run of diverse and strong builds, and that has continued with the Lake of Kalandra league (Patch 3.19).
Among the three Templar ascendancies — Inquisitor, Hierophant, and Guardian — it was most notably the Inquisitor that held primacy as the strongest pick. Both of the currently most viable builds use it as their base. Those are the Righteous Fire and Spark builds. In this guide, we will be presenting you with arguably the stronger of the two, the Righteous Fire Inquisitor. We will guide you on how this build operates and what you will need to do to get it off the ground.
Related: How do Recombinators Work in Path of Exile
Righteous Fire Inquisitor Playstyle
The Templar class is inherently tanky, and every build takes advantage of that and runs with it. That is especially true for the Righteous Fire build, which will spend most of its time in the face of your enemies, burning them from up close. As is obvious, this build uses Righteous Fire as its primary skill, which is then supplemented by auras, then Shield Charge and Frostblink for mobility and exposure. For single-target damage, you will be adding the Fire Trap skill to the rotation. It is a very straightforward and newbie-friendly build, although it can be a little bit scary to get used to because of the way the Righteous Fire skill works and with how many LIfetaps it runs. However, once it gets going, this build has an almost unprecedented clear speed and can only lag a bit during one-on-one boss fights.
Related: Best Marauder Build in Path of Exile
Passive Skill Tree
For the first few levels, you should focus on picking up the initial several nodes to improve damage, resilience, and survivability.

The next leg of your Passive Tree will further prepare your Templar for aura skills that you will be picking up around this time, as well as slowly ramping up resistances and fire damage.

Over the next 15 or so skill points, the tree expands in three directions, picking up nodes that further improve your character and prepare you for the swap to Righteous Fire. Note that there are a few masteries to pick up along the way. Those will be listed in their own section further below.

You should add the DoT and Fire Damage branch around 55 skill points, which is also usually the point at which you should look to swap to Righteous Fire as your main skill.

By the end of the Campaign, you will be looking to fill out some of the lower-left nodes, which will grant you more defensives in the form of life, mana reservation, and resistances. You’ll also pick up two keystone passives, Call to Arms and Unwavering Stance.

As you get into the first few tiers of mapping, your skill tree will be mostly complete. You will look to add a few more useful nodes, and the complete tree would look like this:

Any extra levels after this point should go towards cluster jewel nodes, which will be your next main source of power in terms of passives.
Inquisitor Ascendency Skill Tree
Unfortunately, there is no flexibility of choice with your ascendency tree. The order is also important, as well as a note that you should definitely look to complete two Labyrinths (so 4 ascendency points) before swapping to Righteous fire. You will pick up ascendency nodes in the following order:
- Sanctuary
- Pious Path
- Augury of Penitence
- Righteous Providence

Masteries
Make sure to pick up masteries along the way, as they will play a huge role in your final build. You can try your best to match them to the positions on our propositioned passive skill tree, presented above.
- Life Mastery: +50 to maximum Life.
- Elemental Mastery: +15% to all Elemental Resistances
- Reservation Mastery: Auras from your Skills have 10% increased Effect on you.
- Reservation Mastery: 8% increased Damage for each of your Aura or Herald Skills affecting you.
- Fire Mastery: +20% to Fire Damage over Time Multiplier, -30% to Fire Resistance.
- Fire Mastery: Fire Exposure you inflict applies an extra -5% to Fire Resistance.
- Damage Over Time Mastery: 10% less Damage Taken from Damage Over Time.
- Armor Mastery: Determination has 25% increased Mana Reservation Efficiency.
- Resistance and Ailment Protection Mastery: Corrupted Blood cannot be inflicted on you.
Gems and Gem links
Main Skill 6-link
This is your main link that will define your build throughout mapping and endgame. It’s what makes the build tick and the source of 90% of your damage. All of the support gems in this setup are important for mid- to high-tier maps, so you should prioritize enabling the full 6-link setup as soon as possible:
- Righteous Fire (Blue, 20/20)
- Increased Area of Effect (Blue, 20/20)
- Elemental Focus (Blue, 20/20)
- Burning Damage (Red, 20/20)
- Lifetap (Red, 20/20)
- Swift Affliction (Green, 20/20)
Fire Trap 4-link
This setup might need some equipment browsing or bench crafting to get, as you’ll note that it uses 3 green sockets, which are not exactly a Templar’s forte. Still, this link will help you add some much-needed single target damage for bosses, as well as unique and rare mobs:
- Fire Trap (Green, 18/20)
- Lifetap (Red, 20/20)
- Trap and Mine Damage (Green, 20/20)
- Swift Affliction (Green, 20/20)
Aura 4-link
This will be the build’s main Aura setup. It is an important one to get going, but with the amount of Mana Reservation Efficiency that it runs, it should be fairly easy to do:
- Determination (Red, 20/20)
- Malevolence (Blue, 20/20)
- Summon Skitterbots (Blue, 20/20)
- Unbound Ailments (Blue, 20/20)
Mobility 4-link
This will be your main nobility skill that packs some curses and exposure along with it. It is viable to swap one of the curses for LIfetap if you so choose:
- Frostblink (Blue, 1/20)
- Hextouch (Blue, 20/20)
- Flammability (Blue, 20/20)
- Combustion (Blue, 20/20)
Shield Charge 3-link
Another piece of your mobility puzzle, this skill also serves to keep you alive through the Righteous Fire’s self-damage. It triggers your Consecration and also zips you around, so it’s wise to bind it to your left click:
- Shield Charge (Red, 20/20)
- Faster Attack (Green, 20/20)
- Lifetap (Red, 1/20)
Warcry, Buffs, and Protection
You can fill in the rest of your gem slots with a few useful skills. The most important being the Infernal Cry, which you can use to burst down tough packs of mobs. Note that these don’t have to be linked together:
- Infernal Cry (Red, 1/20)
- Blood Rage (Green, 11/20)
- Vaal Molten Shell (Red, 20/20)
Equipment
Weapon
You should always look for a scepter with extra elemental damage. Fire Damage as a modifier is especially prized. One of the best ways to get a scepter for this build is to find a solid base and then proceed to craft it for yourself over time using a variety of methods. Your most important modifiers include:
- +% to Fire Damage over Time Multiplier
- +1 to Level of all Fire Skill Gems
- +% increased Fire Damage
- % chance to Ignite
Shield
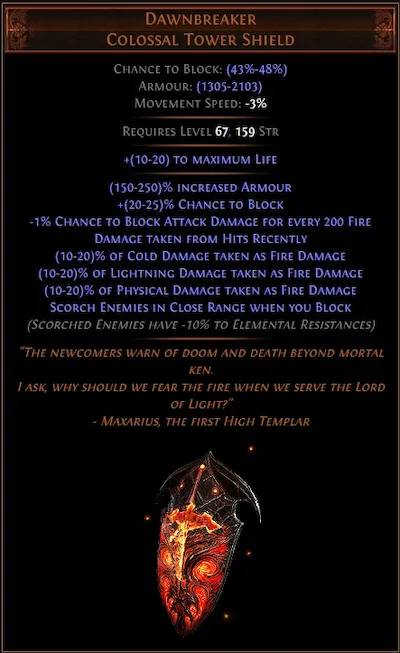
For your off-hand, you could go with a second scepter, however as you progress into the endgame, a good shield is a much better survivability option. That’s where a well-stated unique shield, like Dawnbreaker, can really help your build.
Helmet
You should look for a good rare helm, especially those with Elder influence. Try to get your defensives up, augmented by:
- Socketed Gems deal 30% more Elemental Damage
- +1 to Level of Socketed AoE Gems
Armor
Look for a solid armor + energy shield base, and then you can easily essence craft a good piece. It’s more important to get your 6-link going with the help of a good chest piece. If at all possible, try to get Mana Reservation Efficiency, but links take priority here.
Gloves
Similar to armor, here you want to look for adequate links, and then for stats. As usual, you will want defensives, resistances, and a dash of Dexterity to offset your worst stat.
Boots
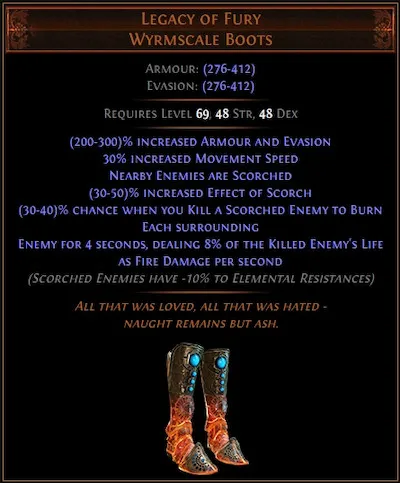
You should be on the lookout for Legacy of Fury. These unique boots are almost mandatory for this build and will enable you to do much more damage than before. Therefore, they will be very high on your priority list.
Amulet
Look for an amulet that adds to your resistances, so that you can focus other gear slots towards other stats. Chaos Resistance can be an especially good find because it procs higher on amulets than most other gear. It is also a good idea to find Damage over Time Multiplier on your amulet as well.
Rings
Similar to the amulet, you will want to get as many resistances on these slots as possible. Add on extra ability stats that you might be lacking, such as Dexterity or Intelligence. As for crafting, look to add Shock Resistance to both of your rings, so that the Shock exposure is less efficient when it hits you.
Belt
As you might expect, your best belt option is a well-stated Stygian Vice, with an Abyssal Jewel. Try to get defensives on them both, as you want to be as tanky as you can get.
Flasks
With such a close-quarters build, you will want to get some utility flasks with decent enchants. Your ideal setup would look something like this:
- Ruby Flask — with “Gain Charges when hit by Enemy” and “50% increased Armor during Effect” enchants.
- Amethyst Flask — with “Gain Charges when hit by Enemy” and “% additional Elemental Resistances during Effect” enchants.
- Quartz Flask — with “Gain Charges when hit by Enemy” and “Regenerate 3% Life per second during Effect” enchants.
- Quicksilver Flask — with “Gain Charges when hit by Enemy” and “10% increased Movement Speed during Effect” enchants.
- Granite Flask — with “Gain Charges when hit by Enemy” and “% increased Attack Speed during Effect” enchants.
Jewels and Cluster Jewels
Especially during the endgame, and most notably in the later part, you should be looking to add a few Jewels and Cluster Jewels to your passive tree. Your best bet is to look for Viridian Jewels with Fire Damage over Time enchants. The second stat should ideally be Maximum Life. As for Cluster Jewels, try to find Medium or Large. Your best skill nodes would be:
- Flow of Life
- Wrapped in Flame
- Student of Decay
- Burning Bright
- Smoking Remains
Anoints
To round out your build and your passive tree, you will want to add one of Cassia’s Anoints to your amulet. Look to farm up two Verdant and one Azure ointment, and with them, get the Arsonist node. This will give you “+10% to Fire Damage over Time Multiplies, Regenerate 1.2% of Life per second,” which is a huge boost that would’ve otherwise been hard to diverge your tree for.
Bandits and Pantheon
During the game’s Act 2, you will be presented with choices to kill or save Bandit Lords, for different bonuses. In the case of your Righteous Fire Inquisitor, you should look to kill all three Bandit Lords, as it can use all the skill points it can get, and those two will go a long way.
For this build, your Pantheons can be any that you feel you need. It is very flexible unlike a lot of other builds. If you are still unsure of which ones to get, then go with Brine King or Arakaali as your Major Pantheons, and with Ralakesh as your Minor Pantheon.
Leveling build
This build does not level with Righteous Fire. You will swap to that main skill only after you’ve finished the Cruel Lab, around levels 45-50. Before that, you will be looking to use a different set of skills and auras.
From passive levels 1 to 28 use Rolling Magma as your main skill. You can support it with Combustion and Elemental Proliferation. Also, use Flame Surge and Frostblink, as well as Vitality, Purity of Elements, and Herald of Ash.
From passive levels 29 to 55, switch to Armageddon Brand and support it with Combustion, Ignite Proliferation, and Lifetap. Keep everything else about the same, except that you want to switch Herald of Ash for Determination. Use Flammability to curse stronger enemies.
After that point, you should look to swap to the Righteous Fire build that we have outlined above and swap your gem links over towards that endgame build. It is especially important to plan your sockets and links accordingly and even delay the swap if you feel that your gear is insufficient.