The Kingdoms of Amalur: Re-Reckoning Fatesworn DLC takes place in a new region of the Faelands known as Mithros. It adds roughly six hours of additional story content along with the expected side quests and armor sets. It’s along this main story path that some of you may find yourselves stumped by a particular puzzle in the Smuggler’s Run quest. Our guide below is aimed at helping you solve the ward puzzle in question.
Within the first two hours of mainlining Fatesworn’s main questline, you’ll come across the Smuggler’s Run quest. After finding Orella in the Smuggler’s Bolthole, you’ll either have to kill her or convince her to run away. Regardless of your decision, you’ll end up acquiring Orella’s notes. To begin the next part of the quest, you’ll have to read it by opening it from the items submenu within the inventory screen.
Solving the ward puzzle
Reading Orella’s notes highlights the next location on the map. In order to gain entry to the Cinderpit, you’ll need to activate the blocks at the entrance in the proper order. Interacting with a block lights up a corner. Every interaction lights up another corner. After four interactions, it resets to one corner. The amount of lit-up corners corresponds to the number assigned to each block or element.
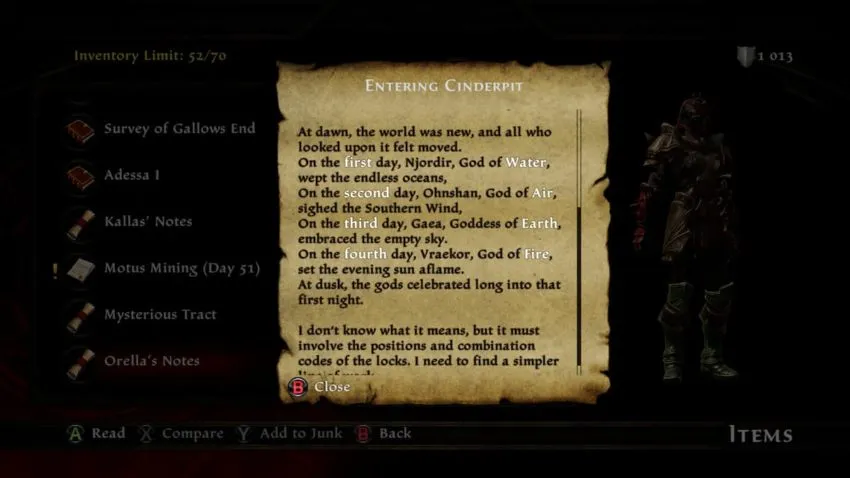
This is where Orella’s notes from earlier come in handy. If you scroll further down, you’ll see a body of text with elements and numbers emphasized within the text. Puzzles of this type didn’t come up in the main game’s story so you’d be forgiven for forgetting to check your inventory. According to the note, this is the proper order in which the blocks should be lit up:
- Water – First
- Air – Second
- Earth – Third
- Fire – Fourth
The earth and water blocks are distinct. Earth is represented by a leaf, meanwhile, water is represented by three lines resembling a small wave. However, the difference between what the game registers as wind or fire may confuse some. The block pictured below is the wind block. It has two of its corners lit up to correspond to the number two as seen in Orella’s notes. After all the blocks are lit in the proper order, you’ll be able to enter the Cinderpit and continue the questline.