Among all of the classes in Path of Exile, the Ranger is the purest Dexterity class available. It’s primarily associated with ranged combat and especially bow usage, but there have been plenty of variations of Rangers over the game’s lifespan, which have used all sorts of different weaponry. In the most recent few leagues, the Ranger variants haven’t really been at the top of the meta but have always had one or two niche builds that could perform very well. This is also the case in the current league, Lake of Kalandra (Patch 3.19).
Like most other classes, the Ranger has three ascendancies: Pathfinder, Raider, and Deadeye. All three have one stand-out build that has defined them in the past several leagues. For example, Tornado Shot has been an outstanding build for Deadeyes for a while now. However, in this guide, we will be focusing on an even stronger build. This build uses the Pathfinder ascendancy and Poisonous Concoction as the main skill. So without further ado, let us dive into the nitty gritty of this Ranger build.
Poisonous Concoction Pathfinder Playstyle
While not considered on par with many other classes, Ranger’s Poisonous Concoction Pathfinder build has several clear advantages that make it a viable option. Firstly, it is a very new-player-friendly build that does not require immense knowledge of Path of Exile to build and run. There is not a lot of item pressure either, making the gearing a mostly simple process. And lastly, it’s a ranged build that has its main skill running from as early as level 12.
Gameplay-wise, you will be running around and “shotgunning” grenades at your enemies, dealing huge amounts of Chaos Damage over Time. This build is great at mapping and bossing once it gets going and has excellent clear speeds due to the high movement speed already built in. As such, it is a solid contender for a farming build, even if you have more specialized characters from some of the more meta classes.
Related: Best Templar Build in Path of Exile
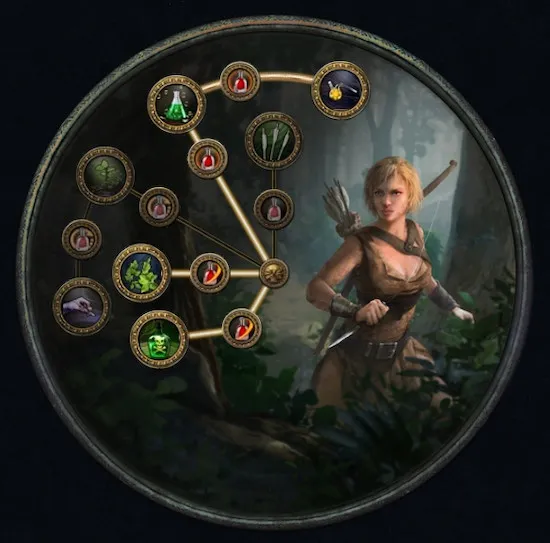
Passive Skill Tree
Starting with the first 32 passive skill levels, you will be picking up some of the important early game nodes. For example, you will be looking for very early picks of Finesse, Primal Spirit, and Heart of Oak, as these three nodes will substantially increase your character’s strength during those tedious first few levels. Progressing further, you’ll look to pick up three masteries as well, which we’ll cover in a segment of their own.

For the next 10 passive skill levels, you should make a sharp turn left towards the center portion of the skill tree. This area houses two important nodes for this build, Wasting and Charisma, and their specific masteries. Early in this portion of leveling, also look to complete the first Labyrinth.

Over the next 12 or so skill points, you should look to fill out some skill nodes and masteries that have been passed by as you made a beeline towards the previous two nodes. Blood Drinker, Revenge of the Hunted, Swift Venoms, and other nodes should all be on your checklist. At this point, the build is getting rounded out, and you should look into getting into Cruel Lab.

As you’re getting close to finishing the Campaign, your build will get stronger. You’ll notice that mobs are dying quicker, too, so the next few nodes focus on survivability. Still, we’re not ignoring the offensive side of the build, so some extra nodes that should help with that are Coordination, Entropy, and Trickery.

Now that the Campaign is over and you’re getting into early maps, your build will be fairly well rounded out. After this point, you should look to see which areas to strengthen. You could go the route of sourcing some Cluster Jewels to fill out, or perhaps go more towards the Shadow part of the tree and grab a few more offensive nodes.

Pathfinder Ascendency Skill Tree
Like many other builds, this one has a set order in which you will have to look to get ascendancy points. The good news is that you will immediately feel more powerful after every completed Labyrinth, as you should have been using Poisonous Concoction from very early on. You will pick up ascendency nodes in the following order:
- Nature’s Reprisal
- Master Toxicist
- Nature’s Boon
- Master Alchemist
Masteries
As you’re leveling up, you will be picking up plenty of masteries along the way, each adding utility or making you more powerful.
- Life Mastery: +50 to maximum Life.
- Life Mastery: 10% increased maximum Life, 10% reduced Life Recovery rate.
- Claw Mastery: +10 Life gained for each Enemy hit by your Attacks, +5 Mana gained for each Enemy hit by your Attacks.
- Poison Mastery: 20% increased Poison Duration.
- Poison Mastery: Poisons you inflict deal Damage 20% faster.
- Chaos Mastery: 20% increased Effect of Withered.
- Reservation Mastery: 8% increased Damage for each of your Aura or Herald Skills affecting you.
- Evasion Mastery: Grace has 25% increased Mana Reservation Efficiency.
- Accuracy Mastery: Precision has 100% increased Mana Reservation Efficiency.
- Flask Mastery: Utility Flasks gain 1 Charge every 3 seconds.
- Flask Mastery: Flasks applied to you have 10% increased Effect.
Gems and Gem links
Main Skill 6-link
This will be your main link and main source of damage. Poisonous Concoction is the bread-and-butter for this build, and you should ideally look to get a Divergent version as soon as you can when you hit endgame. If you’re playing in Trade league, it might be worth purchasing it as soon as you can afford it. Your full 6-link setup would then be:
- Poisonous Concoction (Divergent, Green, 20/20)
- Unbound Ailments (Blue, 20/20)
- Greater Multiple Projectiles (Green, 20/20)
- Greater Volley (Green, 20/20)
- Void Manipulation(Green, 20/20)
- Deadly Ailments (Green, 20/20)
Aura 4-link
These will be your auras. It is important that you set up these in your helmet slots once you acquire The Devouring Diadem. This will fully enable their synergy, so it might be well worth it to plan ahead accordingly:
- Determination (Red, 20/20)
- Purity of Elements (Blue, 20/20)
- Grace (Green, 20/20)
- Enlighten (Blue, 2/3)
Buffs 4-link
These are your buffs, and their main purpose is to activate them during boss encounters or when you’re having trouble with rare or unique mobs. They will grant you extra damage, but you shouldn’t need them during normal clears. You could look for the enhanced versions as suggested, but normal versions of the gems will work just fine too:
- Ancestral Protector (Phantasmal, Red, 20/20)
- Enhance (Green, 3/3)
- Blood Rage (Anomalous, Green, 20/20)
- Plague Bearer (Divergent, Green, 20/20)
Damage Auras 3-link
Another aura link that changes the way they work, turning them into temporary buffs that you can activate. They should share the item with the next single-gem setup.
- Malevolence (Blue, 1/20)
- Precision (Green, 20/20)
- Divine Blessing (Red, 20/20)
Primary Mobility
This will be your main movement skill, and as such, you should look to set it up as your left-click as well:
- Shield Charge (Red, 20/20)
Mobility 3-link
Lastly, gem these skills to your shield slot. You will be using the two mobility skills interchangeably, and then activating Molten Shell as needed:
- Flame Dash (Blue, 20/20)
- Withering Step (Green, 20/20)
- Molten Shell (Red, 20/20)
Equipment
Weapon
Grenade builds in Path of Exile are essentially treated as “unarmed” builds, which means that to be able to throw the main skill, you have to make sure not to have anything equipped to your main weapon slot.
Shield
For your shield, the most optimal option would be to find a well-stated rare shield with a Spell Suppress base. After that, look for stats such as:
- + Maximum Life
- Chance to Suppress Spell Damage
- + Maximum Resistances
- Block Chance
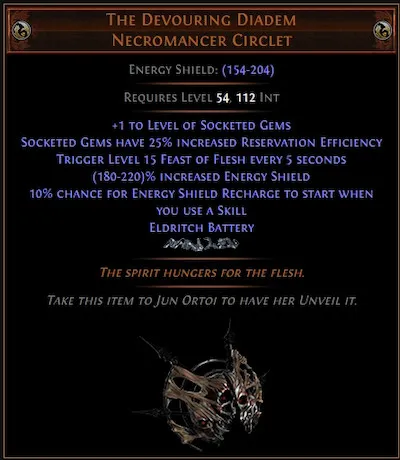
Helmet
For your helmet slot, you have to prioritize getting The Devouring Diadem unique helmet, as it’s close to being mandatory from the moment you enter early maps. Feast of Flesh procs will help with your damage output, and the helmet synergizes perfectly with the aura skill that you socket into it.
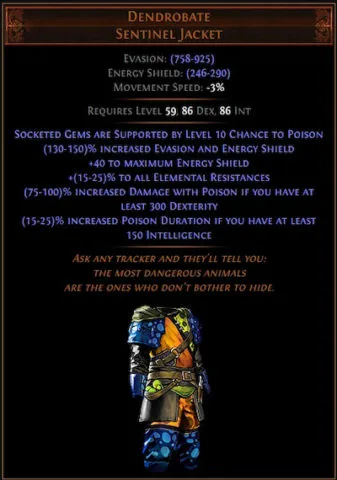
Armor
Another item that comes close to being mandatory is the unique chest armor, Dendrobate. However, you should still first look to prioritize getting your main skill setup fully enabled and then work on getting this armor with all six links and in the correct colors. Once you’ve accomplished that, you will be well on your way to finishing the build. This unique armor increases your damage output by a substantial margin, so keep an eye out for it as you progress through maps.
Gloves
Try to get a pair of rare gloves with good Armor and Evasion stats. Besides that, look for the following stats on them:
- + Maximum Life
- Attack and Cast Speed while Focused
- + Resistances
- Chaos Damage over Time Multiplier
Boots
Like the gloves, look for rare boots with good Armor and Evasion stats to help with your defensives. As for the rest of their stats, keep a lookout for:
- Movement Speed
- + Maximum Life
- + Resistances
- Poisons you inflict deal Damage faster
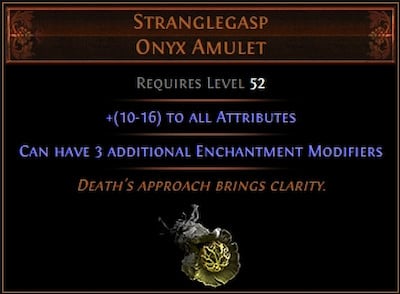
Amulet
Look for a well-stated rare amulet to use while on the hunt for Stranglegasp. This Blight map-only amulet allows you to anoint more than one node — three extra nodes in fact, for a total of four anointments. However, before you can get your hands on a Stranglegasp, look for extra ability points, Resistances, and Life.
Rings
For your rings, you will want to look for stats that help fill in any areas of your build that you might be lacking in. Check your defensives first, and see if you can find rings to supplement those areas. Some generally useful stats to look for are Maximum Life, Resistances, Poison Damage and Duration, and DoT Multiplier.
Belt
Your chase item would be a Headhunter like most endgame builds. But since that might not be a realistic goal for most, look for a rare Stygian Vice and a good Abyssal Jewel.
Flasks
The flasks are a vital part of this build, as can be seen by two dedicated nodes and masteries on the passive skill tree. Therefore, this particular setup has been tailored to activate the potential of this build fully:
- Granite Flask — with “Used when Charges reach full” and “50% increased Armor during Effect” enchants.
- Basalt Flask — with “Used when Charges reach full” and “Increased Evasion Rating during Effect” enchants.
- Quicksilver Flask — with “Used when Charges reach full” and “10% increased Movement Speed during Effect” enchants.
- Quartz Flask — with “Used when Charges reach full” and “% increased Attack Speed during Effect” enchants.
- Divine Life Flask — with “Increased amount of Life recovered” and “Grants Immunity to Bleeding for 17 seconds if used while Bleeding” enchants.
Jewels and Cluster Jewels
This build doesn’t use any specific Cluster Jewels, but you can always keep a lookout for any especially useful ones for when you reach character level 90+. However, before that, it is best to keep the focus on your passive skill tree.
As for the regular Jewels, there are a couple of useful unique ones to look for. For example, Conqueror’s Potency has great synergy with all utility aspects of your build and is very easy to get. Next, there is a more involved choice of Brutal Restraint to fill out your Historic slot. And finally, there is the chase item option of getting the coveted Watcher’s Eye, but by then, your build will likely be deep in endgame content.
Anoints
Ideally, this build looks to leverage not one but four of Casia’s Anoints through the use of the unique amulet, Stranglegasp. The four anoints that you’ll be looking to get, in order:
- Corruption (Crimson, Black, Black)(35% increased effect of Withered)
- Sovereignty (Silver, Silver, Silver)(12% increased Mana Reservation Efficiency of Skills, 10% increased effect of Non-Curse Auras from your Skills)
- Influence (Verdant, Teal, Golden)(14% increased effect of Non-Curse Auras from your Skills)
- Aggressive Bastion (Verdant, Violet, Black)(+5% Chance to Block Attack Damage while holding a Shield, 30% increased Physical Attack Damage while holding a Shield, Attack Skills deal 30% increased Damage with Ailments while holding a Shield, 10% chance to gain Endurance Charge on Kill while holding a Shield)
Bandits and Pantheon
As you’re questing in Act 2, you will have a choice of killing the Bandit Lords or siding with one of them. Each choice gives you a different bonus as a reward. For this build, you want to get as many passive skill points as you can; therefore, the choice is obvious — kill all Bandits.
For the Pantheons, Major Pantheon is not too important and you can pick whichever you feel would work the best. However, if you’re unsure, then you would likely benefit the most from picking Soul of Lunaris for some extra damage reduction. As for the Minor Pantheon, the best choice is Soul of Ryslatha, as it helps with the Life Flask charge recovery. It’s a small utility but nice to have.
Leveling build
This build has the fortune of leveling with the main skill from very early on. You will start with Caustic Arrow and can look to support it with Pierce Support if you get the links. During the leveling part of the game, always prioritize linked sockets, especially green ones. Mirage Archer is another useful support that can help speed up the leveling, provided that you have the links you need for it. Once you get Poisonous Concoction, you can slowly start filling out the support this skill needs. Before the Greater versions of supports listed above, you can use the Lesser versions in their stead (Volley and Multiple Projectiles). Use Dash before you get Flame Dash for your mobility, and your early auras should be Precision, Vitality, and Herald of Agony.